
After modeling (discussed in February), the next phase of completing a high-end visualization piece is the texturing. The visual and tactile quality of a surface (as defined on dictionary.com) is a labor that requires a keen eye and plenty of detail orientation. It’s a tricky business to get it just right.
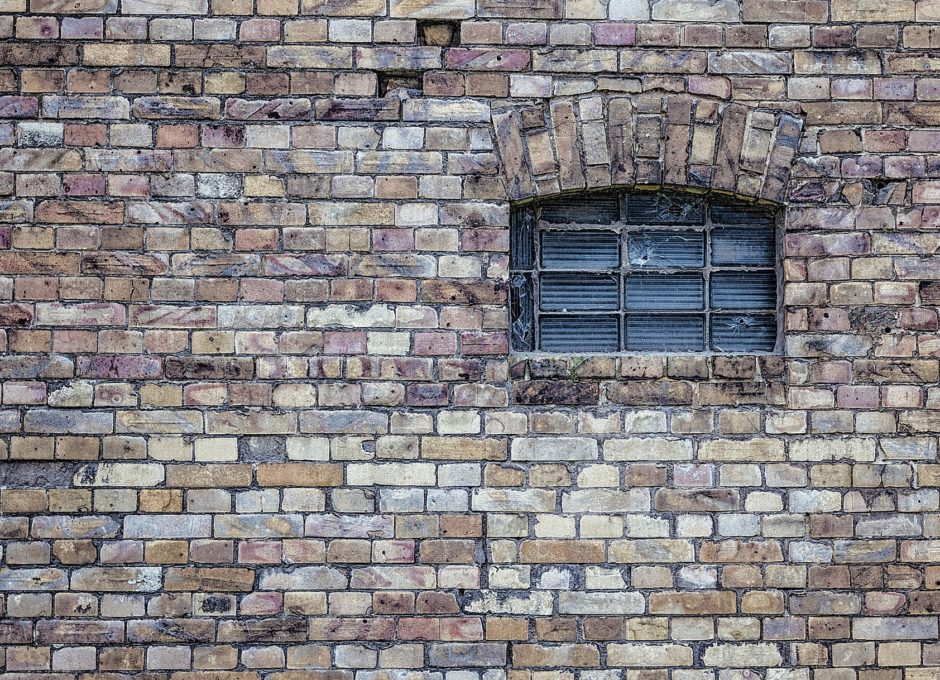
Texturing is equally important to modeling because textures do have to be very true, very realistic. Take a stone wall, for instance. That wall needs to look as though it is completely real. It should be organic in relief and have the swirls of variations of natural color, no aspect of the texture should appear repetitive (because this doesn’t happen in nature), and the stones require the appropriate sheen.
Here’s how we at F13 execute this tall order.
Creating Textures
Every object possesses sheen as well as an index of refraction though their levels of each will be different. Let me explain what I mean.
Whether it be paint, stone, brick, or concrete, every object or surface has some value of sheen – even matte paint. But, a matte paint will have a minimal level of sheen where as a high gloss plastic surface will have a highly visible sheen.
Likewise, every object also has an index of refraction. If you take a piece of glass and look straight through it there will not necessarily be any reflection, but as you slowly start to turn that glass panel to the side it will take on a reflective value. The index measures how far an item would need to be turned before it begins reflecting. There is no material out there that light doesn’t impact in some way. This needs to be represented and considered in each texture applied.
Typical things we do with texturing to add realism (and, I should note, everybody has different ways of creating textures depending on the time allotted for the project and how close we’re going be to the objects) we usually will apply a ‘bump map’ or a ‘normal map’.
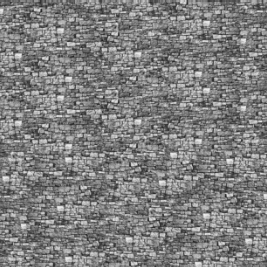 |
 |
| Stone Bump Map | Stone Normal Map |
Both are used for faking depth without the use of lights and without having to add more polygons to create that depth or relief in a texture. The bump map uses variations in the black and white versions of that texture. The normal map is generated by taking the actual textured image and creates an RGB (red, green, and blue) value image of the texture which then creates a more enhanced version of a bump map. There are other options used to add more physical depth to an object. This is necessary for something like a stone wall that needs to have relief to ensure that when close up it doesn’t look flat. A displacement map is an alternative that takes the black and white of a texture and creates a height map that becomes three-dimensional through applying a heavier mesh so that the texture conforms to it.
There are many other tools for enhancing textures, but these are the most commonly used and the ones worth discussing here.
Applying Textures
Once the textures have been created, there are several options that F13 prefers when actually applying them to the objects. These include UVW Map, Map Scaler, and Unwrap UVW.
- The first, ‘UVW Map’, gives us options of different ways of applying a map to an object based on the object’s shape. For example, if an object is round or cylindrical or a box, the UVW Map function will enable the texture to be applied appropriately to the designated shape once specific parameters have been selected. The map can also be scaled within those parameters.
- ‘Map Scaler‘ applies the texture uniformly on all sides of the object regardless of shape. This texture application doesn’t always react appropriately. But, if there is a large surface and it’s okay if the texture repeats itself, then it is saves time to use Map Scaler over the other options.
- ‘Unwrap UVW’ breaks up the object’s texture coordinates into smaller groups so that you can apply textures that would normally not look proper on an object using another UV map option. Let’s break that down. Let’s say I want to take a solid colored shirt on a person (entourage) in my scene. I can’t just apply stripes onto the shirt that the person is wearing because they will distort and not look right. But, if I unwrap the shirt from the shape of the person and apply the stripes on the flattened pattern using Photoshop or any other photo editing program, the shirt can then be applied back to the person and appear correctly. This is only for objects where materials cannot be applied correctly in the other two processes mentioned above where we need to avoid stretching or misshapenness. Both organic and structured shapes can require this. We can even use this technique to weather the texture to make it more realistic in terms of showing dirt and grime and scratches. This provides more control over how the texture should look.
You can see the that difference in the samples below of stone tiling. Notice the believability of the the ‘Good’ tiling versus that of the ‘Bad’ Tiling.
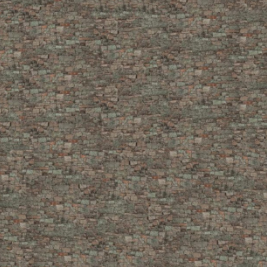 |
 |
| Stone Good Tiling | Stone Bad Tiling |