

There is a method to the madness. It’s true. For each project that we work on here at F13 we employ a specific process. This is a process that as a whole stays the same from project to project, but obviously with some variation.
I’ve been doing 3D renderings and animations for almost 25 years and I’m still fine tuning how F13 operates day to day. We are always trying to think outside the box in terms of making the process efficient and operate like a well-oiled machine. An outline of our process exists on F13’s website but I thought we’d take this opportunity to shine a spot light on each step along the way in order to provide a better understanding of what’s under the hood, or so to speak.
The current topic of discussion: The first step – modeling. Let’s assume we have everything we need from our client to begin work. If ever there is a question of what to provide us with, our clients can find that information compiled in our manual, “The Essential Arch Viz Guide“. (This can be downloaded by entering your first name and email address in the pop up on our website’s Homepage)
Most commonly, the information we collect comes in these formats: CAD drawing, Revit, PDF, 3DS Max, and SketchUp(SU), and we can even work with napkin sketches. Revit, Max and SUmodels can be beneficial and a time saver, if modeled correctly, but not always necessary. If a 3D model is not available, the best scenario is to have CAD drawings. It allows our artists to quickly model a project with accuracy and exact scale. And, it is what we will use for our hypothetical case study below.
Importing the CAD drawings into Sketchup is Step 1. SketchUp (SU) is a program that gives us the most with very little. In other words, it is a very intuitive program and one which you are likely quite familiar with as well. After all, it is the most commonly used software for architectural firms executing basic visualization themselves in the form of rough renderings. The tool palette is very simple and allows us to model a project fairly quickly and with ease. Modeling is what we’re doing here and before we start, we look at the drawings to figure out what materials are being used. We create a layering system within SketchUp that is based on those materials. For instance, if brick existed, we would set up a layer specifically for brick. If we had stone we would set up a layer just for stone, a layer for glazing, or storefront. Every material has a dedicated layer. This is a fairly common practice employed amongst illustrators worldwide. But, the secret sauce is in the organization. This is so that we can find everything fairly quickly especially if we end up with lots of layers. The process is similar to CAD. We name the layers with a letter that represents the different parts of the project. For instance, the letter A and underscore “A_” would be representative of all architectural elements and/or materials being used. Likewise, if we have interior elements we will use “AI_” for Architectural Interior and “L_” for landscape. Some layer names can be employed strictly for ordering purposes. To force them to pop up in the order intended. For example, with CAD drawings brought in for templates we use “X_”. This will allow the CAD drawings to be sent down to the bottom of the list and out of the way of the other layers.

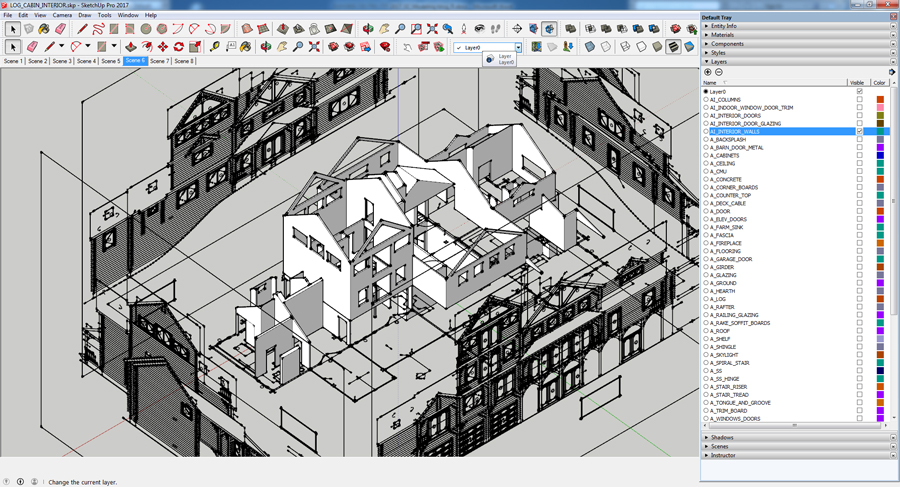
Check out the layering system example to the right here. Having this specific and well thought out layering system in place is big! It allows for us to quickly turn on and off layers as we apply the materials, once we have the model in 3DS Max. It works seamlessly. (More on that next month.)
Now the modeling can actually begin. It should be noted that the import of CAD drawings includes floorplans, elevations, sections, RCP plans, and more – anything that will make our team efficient when the modeling begins. Now pay attention because here’s another place where strategy is used to save time and streamline the process. CAD drawings typically import with all of the layers from CAD. This is a pain. Why? Because over time I figured out that leaving all of those layers intact unnecessarily bogs down the program. So, we condense the CAD into one layer and label it i.e. floor plans, elevations, and sections. This will allow for easy movement throughout the program and prevents a slower process that naturally occurs when time is taken to turn layers off in order to make the system run.
Once all of the CAD drawings are inserted into SU, we line up the floor plans and elevations to their proper orientation just as in this example below. When we have them all lined up we can begin the modeling process.
Layer ‘0’ is ground 0 for project construction. Everything we model will be modeled on this layer and here’s why. When we edit a model we created for a specific layer, any modifications will always be done within layer “0”. Keeping everything modeled here will keep the model clean.
Once we finish creating an object, like a wall (which will have several moving parts) on layer “0”, we will make a group of those moving parts and then send that group to its specified layer. The grouped wall object will then be directed to the “Wall layer”. Makes sense, right? This would go for any other material that is modeled in the project.
Once everything is modeled and sent to its proper layer, the model is ready to bring into 3DS Max for the texturing and lighting. That will be the subject of next month’s blog. We can export the model in several formats that 3DS Max can relate to, but the primary format is .dwg. Exporting the file as a .dwg will retain all of the layering information we created in SU. Lastly, there are several other features of SU to note. These features are not employed by F13 generally, but it is good to be aware of them as options. Within SU, textures can be added in order to convey to the client where materials are going. Sunlight studies can be executed, cameras/viewpoints can be setup, and Google Earth can even be used in order to bring in a satellite image to help align with an existing location. The use of these tools in SU will transfer when imported into 3DS Max. It should be noted that when using SketchUp to set up views for the final series of renderings, there is no wait time during production.
Happy Modeling!